With the release of Visual Studio 2008 device unit testing or in fact desktop unit testing is now built into the IDE which makes unit testing alot easier than before.
Note device unit testing is only supported on Visual Studio Team System 2008 with Test Edition or Team Suite. See here for a Visual Studio product comparison.If you would like to learn more about what agile unit testing is see
here.
With Visual Studio 2005 there were tools such as
Test Driven.net, NUnit,
MBUnit typically were used and still are today, in fact we still use NUnit mainly because we like it, it works and we have hundreds of tests written using it. There are differences with the above tools, we chose NUnit because it was ported from JUnit which worked also.
This article will cover how to use unit testing on a Windows Mobile device and show how simple it is. In fact I am very fond of it as it does in fact do alot of work for you that NUnit doesn't. Also the difference with the VS unit testing over NUnit is that in VS the unit testing is integrated in the IDE.
There are two ways to create unit tests in VS 2008, one is to create tests from production code or to create them by hand. Of course it is less work to create the tests from production code so this is what I'll talk about in this article.
1. Start off with a simple device class library. In this example I have created a simple calculator which adds two numbers together. The code looks like the following:
namespace Calculator
{
   public class SimpleCalculator
   {
       public decimal Add(decimal num1, decimal num2)
       {
           return num1 + num2;
       }
    }
}
As you can see, it is very simple.
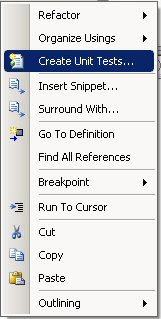
2. Right click the source for which you would like to create the test project, then select "Create Unit Tests..." option.
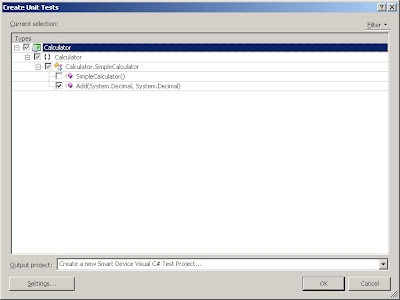
3. Select the method for which you would like to create the test.
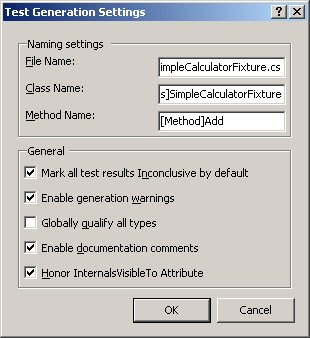
4. Clicking on "Settings..." button will allow you to configure how the unit test wizard will create your test.
Most of the options are self explanatory. I always change the name to the name of the class coupled with "Fixture" ie in this case "SimpleCalculatorFixture". It stems from NUnit days.
The only option that needs to be clarified below is the "Mark all test results Inconclusive by default". This option forces the test to fail when run because it is not implemented. Of course it is good practice to honor this setting.
5. Clicking OK to the Test Generation Settings dialog then click OK again on the Create Unit Tests dialog will prompt you to enter a name for your new test project, enter a name and click OK.
6. After completing the above Visual Studio creates the test project and some test methods. quite neat when you think in the past you'd have to do all this yourself.
In the above example the test code VS generated looks like the following:
using Calculator;
using Microsoft.VisualStudio.TestTools.UnitTesting;
using System;

namespace CalculatorTest
{

   [TestClass()]
   public class SimpleCalculatorTest
   {
       private TestContext testContextInstance;

       public TestContext TestContext
       {
           get
           {
               return testContextInstance;
           }
           set
           {
               testContextInstance = value;
           }
   }

#region Additional test attributes
//
//You can use the following additional attributes as you write your tests:
//
//Use ClassInitialize to run code before running the first test in the class
//[ClassInitialize()]
//public static void MyClassInitialize(TestContext testContext)
//{
//}
//
//Use ClassCleanup to run code after all tests in a class have run
//[ClassCleanup()]
//public static void MyClassCleanup()
//{
//}
//
//Use TestInitialize to run code before running each test
//[TestInitialize()]
//public void MyTestInitialize()
//{
//}
//
//Use TestCleanup to run code after each test has run
//[TestCleanup()]
//public void MyTestCleanup()
//{
//}
//
#endregion


///
///A test for Add
///
[TestMethod()]
public void AddTest()
{
    SimpleCalculator target = new SimpleCalculator();
    Decimal num1 = new Decimal();
    Decimal num2 = new Decimal();
    Decimal expected = new Decimal();
    Decimal actual;
    actual = target.Add(num1, num2);
    Assert.AreEqual(expected, actual);
    Assert.Inconclusive("Verify the correctness of this test method.");
}
}
}
As you can see from the above test code, it is very similar to how things are done using NUnit. Notice the similar attributes used to mark methods. The most notable one being the TestClass attribute the NUnit equivilent is TestFixture. These attributes and all testing methods etc can be found in a simple assembly named: Microsoft.VisualStudio.TestTools.UnitTesting.dll. You don't need to add this to your test project because Visual Studio has already done this for you. It doesn't get any easier than this!!
Many of the methods VS has added for us such as MyClassInitialize, MyClassCleanup etc are commented out they have been added for ease of implementation if required.
7. Now we have everything in place, lets see what happens when we run the test, bearing in mind we haven't written any tests yet, we have simply let VS do its job and create a test project for us.
///
///A test for Add
///
[TestMethod()]
public void AddTest()
{
    SimpleCalculator target = new SimpleCalculator();
    Decimal num1 = new Decimal();
    Decimal num2 = new Decimal();
    Decimal expected = new Decimal();
    Decimal actual;
    actual = target.Add(num1, num2);
    Assert.AreEqual(expected, actual);
    Assert.Inconclusive("Verify the correctness of this test method.");
}
Now running the test will execute the above, of course the line Assert.AreEqual will fail because we have already written our production code which adds the two numbers together so the result of this method call will not be equal. Visual Studio has guessed here what the likely result might be, clever but not quite clever enough!
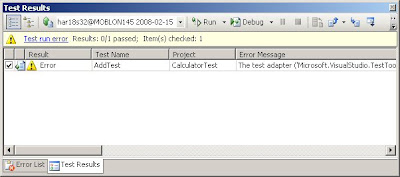
So running the above test results in failure on my machine. I am attemping to run the test on an emulator. The error message I am getting is:
The test adapter ('Microsoft.VisualStudio.TestTools.TestTypes.Unit.UnitTestAdapter, Microsoft.VisualStudio.QualityTools.Tips.UnitTest.Adapter, Version=9.0.0.0, Culture=neutral, PublicKeyToken=b03f5f7f11d50a3a') required to execute this test could not be loaded. Check that the test adapter is installed properly. Exception of type 'Microsoft.VisualStudio.SmartDevice.TestHostAdapter.DeviceAgent.NetCFNotInstalledException' was thrown. I wrote a blog regarding this error a while back
here.
This basically means .NET CF 3.5 is not installed and VS doesn't deploy .NET CF 3.5 before executing the test if required even though the option under the test project properties Devices tab "Deploy the latest version of the .NET Compact Framework (including service packs)" is set.
You can simply deploy a Windows Forms application with the above option set and VS will deploy CF 3.5 just as it's always done, if you don't have a Windows Forms application, deploy the CAB file to the device/emulator manually then run it. After this the tests should execute.
8. Now I have fixed the above problem, lets try running the test again. This time I get the following results in the new Test Results window.
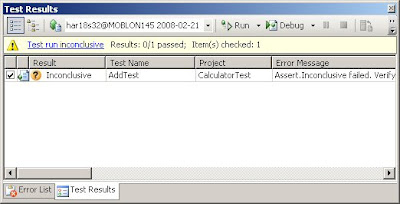
From the above Test Results window it is difficult to read the error as to why the test failed. Double clicking the error row loads the properties window for this particular test which gives us some more information as to why the test failed.
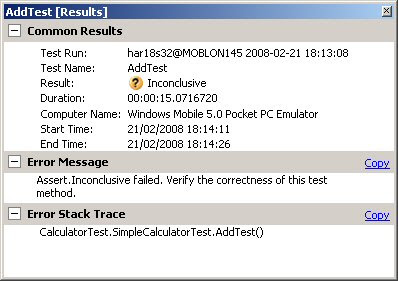
9. As we can see from the error message above the Asset.Inconclusive failed. If you remember when VS creates a test template, it inserts the
Assert.Inconclusive which will fail when run. So to fix this problem, we simply change the test to the following:
        ///
     ///A test for Add
     ///
     [TestMethod()]
     public void AddTest()
     {
         SimpleCalculator target = new SimpleCalculator();
         Decimal num1 = new Decimal();
         Decimal num2 = new Decimal();
         Decimal expected = new Decimal();
         Decimal actual;
         actual = target.Add(num1, num2);
         Assert.AreEqual(expected, actual);
     }
We have simply removed the call to the static method Inconclusive.
Now if we run the above test we get the following:
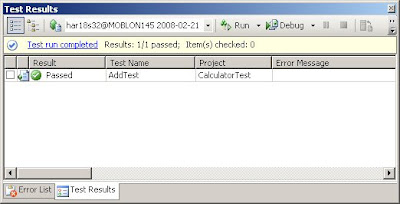
Suprisingly, the test passes. It's not really that suprising because if you look at the AddTest method above, you'll notice that VS has created an instance of two decimal objects which both will be 0 and declared a returning type which isn't instanciated, but the AddTest method creates it and passes it back to the test method. So we are performing this calculation: 0 + 0. Of course the result will be 0 which is why the test passes.
Explore the Assert class, there are many methods to use against your tests much like NUnit. It seems the Testing framework in VS 2008 was built on NUnit and I like it alot!


