Tuesday, February 28, 2012

Where is the "New Virtual Machine Role" menu option in Visual Studio 2010?

A while back I wrote about the new-ish VM Role feature in Windows Azure (still in beta right now). You can read that post here.

If you're not sure what the VM Role is, then this MSDN post should clear that up for you.

Once you have joined the VM Role beta programme, the status should have changed in the Azure Portal to Active, and you should have received an email with links to .reg files which alter relevant Azure Visual Studio registry keys which in turn enables this menu option in Visual Studio.

Figure 1: Active VM Role feature
Unfortunately for me, I received no such email. So I searched the Internet for them and found the location where they can be downloaded.

For 64-bit operating systems see here: http://go.microsoft.com/fwlink/?LinkID=206860
For 32-bit operating systems see here: http://go.microsoft.com/fwlink/?LinkID=205313

Alternatively, you can simply use this key for 64-bit:

[HKEY_CURRENT_USER\SOFTWARE\Wow6432Node\Microsoft\Windows Azure Tools for Microsoft Visual Studio 2010\1.0]
"VirtualMachineRoleEnabled"=dword:00000001


For 32-bit:

[HKEY_CURRENT_USER\Software\Microsoft\Windows Azure Tools for Microsoft Visual Studio 2010\1.0]
"VirtualMachineRoleEnabled"=dword:00000001

Once you have run either of those commands, or edited your registry manually, restart Visual Studio and you should now see the new menu option that will enable you to create a VM role to deploy to Windows Azure:

Figure 2: The new "New Virtual Machine Role" menu option

Enjoy!

Thursday, February 16, 2012

Testing a Custom Filter Provider in ASP.NET MVC 3

There are many good articles published on how to write a custom Filter Provider in MVC 3 in order to make dependency injection possible on the web. So I'm not going to talk about that, but there doesn't seem to be many articles on how to test those custom filter providers.

The role of the filter provider is to simply return filters for a given controller, but this post assumes you know what a filter provider does so I'm going to skip the explaination. I've provided an MSDN link to the FilterProvider technical page for more information.

The FilterAttributeFilterProvider as provided by the ASP.NET MVC framework looks like the following: (I have the ASP.NET MVC source code on my machine, will show how to install and access this code in another post...)

    public class FilterAttributeFilterProvider : IFilterProvider 
    { 
        private readonly bool _cacheAttributeInstances; 

        public FilterAttributeFilterProvider() 
            : this(true) {
        }

        public FilterAttributeFilterProvider(bool cacheAttributeInstances) { 
            _cacheAttributeInstances = cacheAttributeInstances;
        } 
 
        protected virtual IEnumerable<filterattribute> GetActionAttributes(ControllerContext
                      controllerContext, ActionDescriptor actionDescriptor) {
            return actionDescriptor.GetFilterAttributes(_cacheAttributeInstances); 
        }

        protected virtual IEnumerable<filterattribute> GetControllerAttributes(ControllerContext
                     controllerContext, ActionDescriptor actionDescriptor) {
            return actionDescriptor.ControllerDescriptor.GetFilterAttributes(_cacheAttributeInstances); 
        }
 
        public virtual IEnumerable<filter> GetFilters(ControllerContext controllerContext,
                     ActionDescriptor actionDescriptor) { 
            ControllerBase controller = controllerContext.Controller;
            if (controller == null) { 
                return Enumerable.Empty<filter>();
            }

            var typeFilters = GetControllerAttributes(controllerContext, actionDescriptor) 
                             .Select(attr => new Filter(attr, FilterScope.Controller, null));
            var methodFilters = GetActionAttributes(controllerContext, actionDescriptor) 
                               .Select(attr => new Filter(attr, FilterScope.Action, null)); 

            return typeFilters.Concat(methodFilters).ToList(); 
        }
    }
It is the GetFilters method we are interested in as this is the method we override in our custom filter provider to provide things like dependency injection support.

So your custom filter provider might look something like the following (IoC container StructureMap specific):
   
    public class StructureMapFilterProvider : FilterAttributeFilterProvider
    {
        private readonly IContainer container;

        public StructureMapFilterProvider(IContainer container)
        {
            container = container;
        }

        public override IEnumerable<Filter> GetFilters(ControllerContext controllerContext,
                  ActionDescriptor actionDescriptor)
        {
            var filters = base.GetFilters(controllerContext, actionDescriptor);

            if (filters != null)
            {
                foreach (var filter in filters)
                {
                    container.BuildUp(filter.Instance);
                }

                return filters;
            }

            return default(IEnumerable<Filter>);
        }
    }

In the above filter provider, we are getting a list of filters for the passed controller context, and then calling BuildUp on those instances using StructureMap IoC container. This is a neat feature of StructureMap that allows you to support property injection without having to use decorators in the filter classes. If you'd like to learn more about StructureMaps BuildUp feature, please see this link: http://codebetter.com/jeremymiller/2009/01/16/quot-buildup-quot-existing-objects-with-structuremap/

You probably know already that ideally you'd want to call the base.GetFilters(ControllerContext, ActionDescriptor) to be on an interface so it can be easilly stubbed out in out unit tests, but it's not, its part of the superclass that we are deriving from.

So we are going to have to construct a ControllerContext and ActionDescriptor in order to pass into our filter provider during testing. All we are really aiming to test here is that the container BuildUp method is called against the filter instance. Your requirement might be slightly different depending on what you are trying to achieve and perhaps the IoC container you might or might not be using. But the principles should be the same.

Before I show how to test the above we need some supporting code. The first being a mocked controller that is decorated with a filter:

public class FilterProviderControllerMock : Controller
{
    [CustomErrorHandler]
    public void MockAction()
    {
    }
}

So here we simply have a controller with an action named MockAction that includes a custom action and does nothing. Notice how the action is decorated with a CustomErorHandler attribute - which is a custom filter. It's this attribute that we want to inject our dependencies into. I've not shown the code for this as it's not important, what is important is to realise that this filter has dependencies that cannot be injected via the constructor due to limitations in .NET (i.e. it being an attribute).

First consider the actual test code (note: I'm using Moq as my mocking tool of choice - just because it's a change to Rhino):

[TestFixture]
public class StructureMapFilterProviderTests
{
     private Mock<IContainer> containerMock;
     private StructureMapFilterProvider filterProvider;
     private Filter customFilter;
     private List<Filter> customFilterCollection;
     private CustomErrorHandlerAttribute customActionFilter;
     private Mock<HttpContextBase> httpContextMock;

     [TestFixtureSetUp]
     public void Setup()
     {
         customActionFilter = new CustomErrorHandlerAttribute();
         customFilter = new Filter(customActionFilter, FilterScope.Action, 1);
         customFilterCollection = new List<filter>();
         customFilterCollection.Add(customFilter);
         containerMock = new Mock();
         filterProvider = new StructureMapFilterProvider(this.containerMock.Object);
         httpContextMock = new Mock<HttpContextBase>();
     }

     [Test]
     public void CanInterceptCreationOfFilters()
     {
         // Arrange
         containerMock.Setup(x => x.BuildUp(customActionFilter));
          
         var controllerMock = new FilterProviderControllerMock();
         var routeData = new RouteData();

         var controllerContext = new ControllerContext(this.httpContextMock.Object, routeData, controllerMock);

         ControllerDescriptor controllerDescriptor = new 
                     ReflectedControllerDescriptor(typeof(FilterProviderControllerMock));

         var mockActionMethodInfo = controllerMock.GetType()
             .GetMethods(BindingFlags.Public | BindingFlags.Instance)
             .Where(x => x.Name.Equals("MockAction")).FirstOrDefault();
         ActionDescriptor actionDescriptor = new 
                 ReflectedActionDescriptor(mockActionMethodInfo, "MockAction", controllerDescriptor);
       
         // Act
         var filters = filterProvider.GetFilters(controllerContext, actionDescriptor);

         // Assert
         containerMock.Verify(x => x.BuildUp(this.customActionFilter), Times.Once());
    }
}
So what's going on here, there seems to be a lot of code. There is because the superclass filter provider is hard to test due to how it was designed (using inheritance). So the test above is simply creating a ControllerContext and an ActionDescriptor which is required in order to call the filter provider. Doing these things requires a bit of .NET reflection that would normally be done by the MVC framework at runtime. Once reflection has been used and the correct action method has been identified, the provider can easily select the correct filter then our custom filter can build it up (inject all required dependencies into the filter). We then finally assert that the build up happens on our custom filter at least once otherwise the test will fail.

I'm sure in later releases of ASP.NET MVC this will improve, but for now this is a work around to test your custom filter providers.

This sample code is up on BitBucket here if you want it: http://code.simonrhart.com/mvc-3-examples/src/5b122b445c86/Testing%20StructureMap%20Filter%20Provider

Enjoy!

Tuesday, January 31, 2012

MakeCert Error: Too many parameters

I was just reading this MSDN post on creating a self-signed certificate for use with ADFS: http://msdn.microsoft.com/en-us/library/bfsktky3.aspx

The command I need, looks like the following:

Makecert -r 
-pe 
-n CN="www.example.com" 
-b 05/10/2010 
-e 12/22/2011 
-eku 1.3.6.1.5.5.7.3.1 
-ss my 
-sr localmachine 
-sky exchange 
-sp "Microsoft RSA SChannel Cryptographic Provider" 
-sy 12  

If you copy the sample command from the MSDN page above and run it via the command-line, you'll get error "Too many parameters". It turns out the dash used in the MSDN post above is actually character: \u2013 (DASH-EN) and not minus \u002D and it's the minus character that the tool is expecting.

So to make this work, simply replace the hyphen with the minus sign when keying in the command as defined above. In the above sample, I have replaced the incorrect character with the correct one so feel free to just copy and paste it.

I learned this from here http://social.msdn.microsoft.com/Forums/en-US/wcf/thread/1e41910f-2f89-439c-93a6-57e5c391d7ca/

Thanks to Carlos Figueira for finding this.

Wednesday, January 11, 2012

My Microsoft Windows Azure 2012 wish-list

UPDATE: Also I'd like to see a version of the Service Bus that's compiled against the .NET Framework v3.5 as not all consumers are able to move to .NET 4 right now.

I have come up with my Microsoft Windows Azure wish-list for 2012 below (hope the Azure product group read this :)
  1. Auto scale compute instances (I know third-party tools exist) 
  2. Allow for scheduled suspended instances that do not eat compute time and also allow for auto scaling out/in schedules without having to delete services from Azure 
  3. Load balancing (F5) for compute instances not round robin 
  4. Ability to configure topic/subscriptions rules via the Azure Management Portal 
  5. Access Control Service support (or any type of federated security support) for SQL Azure for alternate additional security
  6. Out of the box storage editor for managing blobs, tables and queues (I know 3rd party tools exist and you can do this in Visual Studio) 
  7. Developer fabric for Service Bus and Service Bus queues and topics (this would be awesome)
  8. Portal support for VM roles i.e. uploading VHD's (I know command-line tools exist) 
  9. Out of the box support for viewing Service Bus queues and topics and verifying Service Bus endpoints without retrieving the ATOM service bus feed (I know open source code exists) 
  10. Access Control Service support for storage, tables, blobs, and queues 
  11. Support for Hadoop/Big Data on Azure or any type of high performance computing perhaps a instance that targets or VM role to support Windows Server HPC 2008
  12. An easy DR strategy for all Azure services i.e. compute, storage etc.
  13. Managed Service Management API
  14. Give MSDN subscription holders 12 month usage

There in no particular order, not asking much am I!

Thursday, January 05, 2012

VM Role custom VHD instance in Azure Compute - avoid the gotchas!


Background on the VM Role for Windows Azure
Even though I have a ultimate MSDN account which means I have 1500 hrs of free compute time on Azure, I'm using the free 3 month trial anyone can get regardless of whether you have an MSDN account or not.

I got this account (let me correct that) I received this Azure account from a colleague due to sickness and haven't given it back! since then I have been exploring many of the new features within Azure using this account. The thing that has caught my attention, is that, many people within the community is referring to the VM Role as IaaS or Microsoft's attempt at IaaS (which it is *not*).

Steve Plank DPE in Microsoft Reading UK has a very good post on this subject here just to clear up any confusion: (Windows Azure VMRole != IaaS) http://blogs.msdn.com/b/plankytronixx/archive/2010/10/29/windows-azure-vmrole-iaas.aspx

Remember, once your custom VM Role instance is deployed and you are running code on that image, the PaaS model works in the exact same way as a out-of-the-box Azure OS image does when using either Web Role or a Worker Role compute instance. Meaning that on reboot the image could be rebuilt and deployed in another rack or sector and any data you might have written to that particular instance will have been lost.

VM Role compliments the Worker and Web roles in Azure compute. All these services still fall under the standard PaaS compute model in Azure. It just so happens that you are in control of the actual image (OS image) that gets deployed to the instances you have specified. The image currently (as of Jan 2012) has to be Windows Server 2008 R2 Standard or Windows Server 2008 R2 Enterprise edition. In terms of licencing the OS, this is covered as part of the compute costs when you actually deploy your application to run on the custom image.

Today (Jan 2012) the VM Role feature is in beta and if you attempt to upload a custom VM VHD to Azure without being in the beta, it will fail - don't learn this the hard way like I did! instead simply request to be in the beta programme from the Azure Management Portal. You can do this by logging onto the Azure portal management web site: http://windows.azure.com/ then clicking Home. Then right at the top click Beta Programmes. You should then see the VM Role feature, simply click the check box then click Apply or OK. Once you do this you will normally be accepted within 1 day or so.

My Azure 3 month trial account has now been disabled so I can't show screen shots until I sign up using my MSDN account which I haven't done yet. Finding this beta programme link isn't hard though.

Types of VM technologies supported
Notice I keep saying VM Role VHD instance. Yes you are correct, Azure today only supports Hyper-V virtual images. I am unaware of any technology that will create these images other than a physical Windows Server machine running Hyper-V. I do happen to have a couple lying around so creating them wasn't an issue for me but I can see it being a problem for folks that do not have hardware lying around to use. I'm interested to hear any potential solutions around this. My desktop vitalisation technology of choice today is Oracle VirtualBox. VirtualBox can mount and run VHD's but I'm unaware of being able to actually create them using VirtualBox.

Uploading a VM Role image to Windows Azure
This post talks you through the entire process of creating a VHD and deploying to Azure, it's very good: http://msdn.microsoft.com/en-us/gg502178 This article also shows you how to target that custom image in Visual Studio.

The syntax is slightly wrong for the upload of a VHD image though. It is actually quite strange with the odd quotes and hyphens etc. Just to be clear, today, there is no support for uploading a VHD using the portal, you need to use the Azure SDK tool csupload. I am unaware of a RESTful API to do this, no doubt there is.

An example of it's usage is as follows:

 csupload Add-VMImage -Connection "SubscriptionId=xxxxxxxx-388a-4304-90c7-d239c3843624; 
CertificateThumbprint=xxxxxxxxxxxxxxxxxxxxA115BE5D35A45D4E18F7" 
-Description "Base image Windows Server 2008 R2" 
-LiteralPath "\\\nodes\baseimage.vhd" 
-Name baseimage.vhd -Location "North Europe"
  

You'll need to run that command from an administrative Azure command-prompt.

Of course you need to use you're own Windows Azure Subscription ID and x.509 certificate thumbprint. Note, regarding certificates, even if you have the correct thumbprint, you will need the actual certificate installed in the certificate store from where you run this upload command.

The tool is quite clever in that it compresses the VM image before upload. The web site link above covers this process in quite nice detail and where you go from here.

Be patient though, this process takes a while to run - of course depending on your upload speed.

So why would I ever use a VM Role?
This has been talked about so much already in the community but I though I'd add my view on the subject.

There are many cases where you simply need custom code running within the standard image that would otherwise not be possible or installable as a start up custom task (the process of running custom installers when the instance is booted and comes out of sys-prep mode).

One example is performance testing. It could be that you setup a core base image with a tool such as LoadUI for performing performance testing in the cloud saving the need to run this testing on on-premise hardware. This could also include configuration for performance counters.

There are many other scenarios similar to the above. But remember, treat any data being written locally as transient data.

Saturday, December 31, 2011

The trust relationship between this workstation and the primary domain failed

This evening I encountered an error while attempting to log onto my Windows 7 client machine: The trust relationship between this workstation and the primary domain failed


I have a Windows Server 2008 R2 domain controller running DHCP, DNS and of course ADDS.

I figured out the issue (although I would have never of suspected it) moments before the error, I was reconfiguring the DNS IP address for a scope against my DHCP server.

Below is the DHCP scope editor for DHCP in Windows Server 2008 R2. This is a fairly old box which I haven't changed that much over 2 or so years and it is used by many devices/machines.

Searching the web didn't really give any firm solutions other than to rejoin to the domain. so I tried that and it worked.


I think it would be a good idea to raise a bug report for this.

Happy new year!

Thursday, December 08, 2011

London Windows Azure User Group LWAUG - first meeting update

LWAUG - what a mouthful! As mentioned in an earlier post, I attended the LWAUG first meeting on Tuesday night in London. I thoroughly enjoyed it and learned a lot from it. I also found it particularly useful talking to various folks during breaks and after the talks - as I do with most user groups, engaging with members and exchanging experiences/knowledge is one of the reasons I attend.

Sadly though, I could only stay for Richard Conway's talk on Service Management API's in Windows Azure. Service Management API's allow you to programmatically create and deploy services into Azure. I missed Andy Cross's talk on diagnostics as I had to get back to Norfolk, I didn't get home until 00:30am. Andy's slides can be obtained here: http://lwaugbe.blob.core.windows.net/talks/Fluent%20Diagnostics%20Dec%2011.pptx. (note the use of Azure blob storage to store the files!).

I am told some of the service management API's as demoed by Richard are undocumented. Everything talks via REST in Azure, sorry SOAP folks, nothing to see! REST is removing all the fluff you get with SOAP. SOAP just doesn't scale when you're trying to consume services over constrained low-bandwidth networks such as EDGE and GPRS. As we have a ever so increasing breadth of varied connected devices, i.e. net books, smart phones, laptops, PDAs, tablets etc this is a very big deal. So I'm glad the Microsoft Azure architects stuck with REST in Azure. Anyway, I think this is a big subject and one we could discuss at a future LWAUG event(s).

See here for documentation around Service Management REST API's in Azure: http://msdn.microsoft.com/en-us/library/windowsazure/ee460812.aspx it seems fairly extensive, those messages can easily be sent via Fiddler so you don't need to write anything to play around with the API.

You can download Richards slides here: http://lwaugbe.blob.core.windows.net/talks/Service%20Management%20Dec%2011.pptx (again from blob storage)

Also Richard has uploaded his code used in his demo's here: http://lwaugbe.blob.core.windows.net/talks/HostedServices.etc.zip definitely worth looking at if you want to auto-deploy your Windows Azure services into Azure Compute via mechanisms like continuous deployment for seamless integration for your testers and developers.

I'm looking forward to the next meet.

Monday, December 05, 2011

London Azure User Group first meeting - 6th December


Tomorrow night (6th December 2011) I'll be attending the new London Windows Azure User Group meeting near Liverpool Street.

I learn't about it when I attended the recent Windows Azure Bootcamp run by Steve Planky due to the fact that the person that was mean't to go couldn't due to sickness, so I went instead.

I plan to do future presentations for this group and looking forward to it.

There is another Azure user group called UK AzureNet that started in 2009. Lately it has been rather quiet so it's good to see some interest in Azure once again in the community.

If you are quick there seems to be a couple places left, register here: http://www.lwaug.net/

Sunday, December 04, 2011

Why I prefer BitBucket over GitHub


UPDATE 07/01/2012: Thanks to Atlassian for the free BitBucket T-Shirt! :)

I don't really care that GitHub has more repositories or has more traffic or is more popular than X in this case BitBucket. All I really care about is features, and I think BitBucket has more of them.

I wrote about how excited I was about BitBucket a few days ago on my other blog here: http://smart421.wordpress.com/2011/11/17/why-i-like-bitbucket/

I recently read this post: http://www.pocoo.org/~blackbird/github-vs-bitbucket/bitbucket.html that talks how GitHub is identical to BitBucket except according to Google, GitHub has a much larger community than BitBucket. I think that goes without saying. There is even support for GitHub in linkedin so you can link your repositories to your linkedin profile - I like that.

However with GitHub you have to pay for things like; disk space and private repositories. Well, you do get 300Mb free with GitHub - with BitBucket there is no limit. I need to elaborate on this a bit more. GitHub says these limits are "Soft Limits" and this is to prevent abuse, abuse from what!? adding everything I have ever written to a repository perhaps!

With GitHub the Web UI is just not very intuitive. For example, I was just trying to create a repository, and I'm still trying to figure out how to do it. This could be because I do not have a credit card on file. When clicking "Repositories" I'd expect some kind of link, or button to create a new repo or something.

With BitBucket this is so much finer, I find it a lot more intuitive and I don't have to enter a credit card unless I need to exceed the 5 free contributors I got when I signed up.

Another feature I really like with BitBucket (not sure if you can do this with GitHub) is import repositories from other source control systems such as Git, Mercurial or SVN. You can also create new repositories using Mercurial or Git.

And finally, I like that fact with BitBucket the ability to use a custom internet domain for all my repositories. For example I've set a CNAME record: http://code.simonrhart.com/ to resolve to bitbucket.org. And it just works, navigating to my above sub domain, resolves to my BitBucket account.

So remind me again why I'd use GitHub over BitBucket?

Thursday, December 01, 2011

MSDN Subscribers - get you're free Azure account...

MSDN subscribers: http://www.microsoft.com/windowsazure/msdn-benefits/

Non MSDN subscribers for the 90 day trial: http://www.microsoft.com/windowsazure/free-trial/

There used to be a link on the MSDN subscription page but it has seemed to have been moved so I wrote this blog post so I never lose it again and hopefully inform others.

The benefits vary depending on your level of MSDN subscription. For example ultimate users get 1500 compute hours per month - I think that is pretty good.

Nice!

Windows Azure (compute) still accrues compute time whilst services are suspended

I wrote a post last year when I got billed for services that I had deployed to Windows Azure compute instances here: http://www.simonrhart.com/2010/05/moving-windows-azure-ctp-account-over.html

I got billed because when Azure went from CTP to RTM, they started charging customers, no surprise there! but because I forgot I had some demo services deployed in Windows Azure, I got charged. So I quickly deleted them.

I started using Windows Azure compute again - historically I've only used Windows Azure AppFabric which in most cases doesn't use Windows Azure Compute - i.e. you don't normally host any custom services in Windows Azure, instead you use the service bus to relay messages back to your on-premise data centre.

It's good to know now that Microsoft make this very clear in the new-ish management portal (written in Silverlight):


So now it is fairly explicit, so no excuses people, when you get billed for deployed disabled services, don't complain! To stop billing from occurring, you need to delete the services using the management portal entirely, that is of course you don't intend to use those services.

Heads up on the new portal, I like it, it's a much improved user experience over the old multi-site portal for each SQL Azure, Windows Azure and Windows Azure AppFabric. Now management it done under one portal site.


Tuesday, November 29, 2011

OpenQA.Selenium.WebDriverException : Failed to start up socket within 45000

If you have tried using the FluentAutomation with Selenium recently or in fact the Selenium WebDriver API directly within an automated test using something like NUnit, you might have encountered the following exception when used with Firefox:

 OpenQA.Selenium.WebDriverException : Failed to start up socket within 45000
  
 at OpenQA.Selenium.Firefox.Internal.ExtensionConnection.ConnectToBrowser(Int64 timeToWaitInMilliSeconds)  
 at OpenQA.Selenium.Firefox.Internal.ExtensionConnection.Start()  
 at OpenQA.Selenium.Firefox.FirefoxDriver.StartClient()  
 at OpenQA.Selenium.Firefox.FirefoxDriver..ctor(FirefoxBinary binary, FirefoxProfile profile, TimeSpan commandTimeout)  
 at FluentAutomation.SeleniumWebDriver.AutomationProvider.Navigate(Uri pageUri)  
 at FluentAutomationDemo.Integration.TestClass1.Test() in Class1.cs: line 19   


Figure 1: Selenium test failure in Visual Studio

The latest version of the FluentAutomation uses the Selenium.WebDriver v2.8. This FluentAutomation can be installed via NuGet using the Package Manager Console:

 PM> Install-Package FluentAutomation.SeleniumWebDriver  

Alternatively, you can get the code on GitHub here: https://github.com/stirno/FluentAutomation The C# code I used to generate this error looks like the following:

 using FluentAutomation.API.Enumerations;  
 using NUnit.Framework;  
 namespace FluentAutomationDemo.Integration  
 {  
   public class TestClass1 : FluentAutomation.SeleniumWebDriver.FluentTest  
   {  
     [Test]  
     public void Test()  
     {  
       I.Use(BrowserType.Firefox);  
       I.Open("http://www.google.com");  
       I.Enter("Fluent Automation API").In("#lst-ib");  
     }  
   }  
 }  

So as you can see, it is simply trying to insert Fluent Automation API in the search box of a Google page using FireFox. It seems the Selenium WebDriver does not support the latest version of Firefox which is at the time of writing: 8.0.1. A workaround is to downgrade to Firefox v7.0.1.


To do this you then need to uninstall Firefox and download an old version from here (you can't get the old versions from the Firefox site): http://www.oldapps.com/firefox.php

Figure 2: Removing Firefox 8.0.1
By default the Firefox settings it set to auto update to the latest version available. You can turn this off thankfully.

To turn off the auto-update feature, simply un-tick the Firefox check box as in Figure 3 below, then click OK.

Figure 3: Firefox advanced options
Rerun the unit tests and all should be well.

Friday, November 11, 2011

Code formatter for blogs

I came across this site that allows for easy formatting of source code for displaying on blog posts. Pretty cool. This is a test post...
   public class StructureMapFilterProvider : FilterAttributeFilterProvider  
   {  
     /// <summary>  
     /// Structuremap instance.  
     /// </summary>  
     private readonly IContainer container;  
     /// <summary>  
     /// Initializes a new instance of the <see cref="StructureMapFilterProvider"/> class.  
     /// </summary>  
     /// <param name="container">The container.</param>  
     public StructureMapFilterProvider(IContainer container)  
     {  
       this.container = container;  
     }  
     /// <summary>  
     /// Intercept's GetFilters, then use the "BuildUp" feature of structuremap to avoid using decorators for property injection and this  
     /// involves coupling.  
     /// </summary>  
     /// <param name="controllerContext">The controller context.</param>  
     /// <param name="actionDescriptor">The action descriptor.</param>  
     /// <returns>A list of filters for the current context.</returns>  
     public override IEnumerable<Filter> GetFilters(ControllerContext controllerContext, ActionDescriptor actionDescriptor)  
     {  
       var filters = base.GetFilters(controllerContext, actionDescriptor);  
       if (filters != null)  
       {  
         foreach (var filter in filters)  
         {  
           this.container.BuildUp(filter.Instance);  
         }  
         return filters;  
       }  
       return default(IEnumerable<Filter>);  
     }  
   }  
Neat, I like it!

Thursday, October 13, 2011

TFS 11 - initial review

Over the past few days I have been able to download and try out some of the new features in TFS 11. Thankfully the product architectural wise hasn't changed, most of the changes are enhancements to an already well designed product.

Here are some of my favourite enhancements to TFS 11.

1. Active Directory user description support

We now get actual full user descriptions as specified in Active Directory instead of actual AD user names as per pre TFS 11 for history tracking. So viewing history on a single source code file now gives you the following in figure 1. This is important as some companies use numeric user id's which makes it more difficult to know who did what.

Figure 1: Active Directory full user descriptions in history tracking
2. Scrum process template now included out of the box

The Scrum v2 process template installed by default with TFS 11. In TFS 2010 you had to download and install the Microsoft Scrum v1 process template.

Figure 2: Scrum v2 preview process template included with TFS 11
3. DEV11: New Solution Explorer

Solution Explorer has now been replaced with the popular Visual Studio Power Tool Solution Explorer. See figure 3. The enhanced solution explorer out of the box lists member names that allows you to simply select the member and Visual Studio will show the code editor. You can also search for types within the search box in the new solution Explorer.

Personally I prefer ReSharper for this (CTRL + T) as it's much faster.

Figure 3: DEV11 New Solution Explorer
See figure 4 below for searching for a type in the new Solution Explorer.

Figure 4: DEV11 Searching for types using the new Solution Explorer
 4. Support for DEV10

I tested DEV 10 (VS 2010) with TFS 11 and it performed as per normal unlike VS 2008 - TFS 2010 in that you had to install a forward update patch. Also using DEV 08 with TFS 2010 was not completely supported. For instance, there were some features in Team build regarding Build definitions you couldn't edit correctly. Some work item reports wouldn't work and you couldn't edit some work items in the IDE. It appears DEV 10 - TFS 11 is alot better in this area than DEV 08 - TFS 10 is.

I haven't yet tested DEV 08 with TFS 11 and not sure if it is supported.

5. Build definition enhancements

You can now set build definitions to either; Enabled, Disabled or Paused status. This is a really powerful feature as sometimes you just want to disable a build while you reconfigure the build servers or fix some issues with the failing build process. During these times, you don't want builds executing but at the same time you don't want to delete the build definition. Figure 5 shows the new UI in DEV 11.

Figure 5: Enable, pause or disable build definitions in DEV 11
6. Rollback feature

A rollback feature is now part of TFS/DEV 11. This is a nice feature, rolling back code pre TFS 11/DEV 11 was a pain and most developers used the TFS Power Tools to achieve this easily. Now in TFS 11 that feature has made it into the main product. It is as easy as selecting the changeset and choosing "Rollback".

Let's see this in action as I think this is worth showing... Now if I delete action About from the HomeController class in our MVC 4 application as shown in figure 6. We will have a pending change. Pending changes has been re-engineered in DEV 11, it can be seen in figure 7. More on this later. You can see the pending change is on the HomeController class we just changed.


Figure 6: About action on the HomeController has been removed

Figure 7: New pending changes view
Now lets check that change in. Once we do that, DEV 11 tells us the changeset id, as per figure 8.

Figure 8: Successful check in
Now if we look at the history of our MVC application, we get the familiar following: figure 9.

Figure 9: Familiar application history, showing how we can rollback a changeset
Notice we have a new context menu option "Rollback Entire Changeset". So we could rollback which ever changeset we wished, this is really easy. Lets choose to rollback the deletion of the About action as this is now causing the testers to raise a defect. But first lets be sure that our checked in code did actually cause the app to break. Pressing F5 runs the app. Figure 10 shows it loads ok (new MVC 4 layout):


Figure 10 Successfully loaded our MVC 4 application

Now if I click About on the landing page, I get the following error:
Figure 11: Error when attempting to execute the About action on the HomeController
So I think we need to rollback that bug we introduced. So right clicking the changeset 10 and choosing "Rollback this Entire Changeset", be careful here are you do not get a prompt. As soon as I did this Visual Studio asked me if I wanted to reload HomeController.cs as it has been modified outside of the source editor. So here, I selected Yes.
If I open up the HomeController class in Visual Studio, I now notice that the About action is back, nice. I like this feature. Figure 12 shows this:

Figure 12: About action is now back from a previous changeset
So how did this happen? I would expect some history against the application on the server, something like "Rollback to changeset ...". But looking at the history for the application shows the the latest changeset as 10 as per Figure 9 above. If you don't believe me, try it for yourself!

Changeset 10 was the changeset where we deleted the About action from the HomeController class.

So what is going on here?? If we look at our pending changes, we will see that HomeController is in an Edit, and Rollback state, see figure 13 below. So the tool figures out which files are different from within the changeset that you have asked to roll back, then merges them with your local workspace. So now all I have to do is commit/check in.

Figure 13: State of our workspace after a rollback
Once I do this, TFS assigns that change set like any other, it increments by 1. So after that check in, TFS assigns it as change set number 11. See figure 14 below:

Figure 14: History post rollback commit
I think this is a really powerful feature and this is as easy as it should be to rollback server side changes.

7 Filter build definitions

The community (including MVP’s) asked and the ALM product team delivered! With VS 11 you can now filter build definitions. This is a simple feature but will make our lives so much easier. See figure 15 for an example of this:

Figure 15: Filtering build definitions in DEV 11
In figure 15 above, I simply typed "release" and got all the release build definitions listed that matched "release".
There is also a concept of “Favourite builds” and is stored per user which is neat.
This concludes my initial review of TFS 11 - for now anyway. There is a lot more to cover off, particually around the new work item tracking and using the enhanced web portal for managing work items much like TFS Workbench does but instead using a web browser.

I recommend you download the CTP and try these features for yourself...

Thursday, September 29, 2011

BizTalk 101 - Publish subscribe MessageBox explanation diagram

The following diagram is useful for explaining how the MessageBox works in BizTalk server particularly when you are new to BizTalk. Remember that BizTalk uses the publish/subscribe messaging pattern for everything. Even for what appears to be synchronous message calls. Even Orchestrations subscribe to the MessageBox for the execution of those rules.

Thanks to Dino Fassis for forwarding this onto me. Sorry I'm not aware who created this great diagram, but thanks to you for this great work.

Saturday, September 24, 2011

ReSharper 6 now supports ASP.NET MVC 3


I'd like to say to a big thanks to the chaps over at JetBrains for once again giving me a free NFR (Not for resale) copy of ReSharper 6.

If you have never heard of ReSharper or not quite sure what it is, I have written about this Visual Studio plugin multiple times in the past. here, here and here.

There are quite a few new features in this latest release. Most of which are around support for ASP.NET MVC 3 and the new Razor view engine.

This blog post assumes you know ASP.NET MVC 3 fairly well. If not check out Microsoft's ASP.NET MVC 3 tutorials. I'd start here: http://www.asp.net/mvc/mvc3


Razor view to controller navigation

So in the previous version of ReSharper which is v5.1, there was little support for the integration between Razor (views) and the Controllers. This was because ReSharper 5.1 was released before MVC 3 shipped. Also, by default, there is no validation provided by the MVC 3 developer tools. So if you happen to write a piece of HTML Razor markup like so:

@Html.ActionLink("Register", "Register2")

The above code will execute action method Register2 on the Controller that the view was generated from. In this case the controller is the Account controller as this is the default application I am testing ReSharper on that gets generated from the T4 VS template for an MVC application. The above code will compile and run. You won't actually know that the above markup is in error until you actually run the application and browse that actual page. There is no tool support in Visual Studio that will tell you that this will error.

When running the application with the above markup, the following error is returned in Figure 1 below:

Figure 1: Error when attempting to execute an invalid action from a Razor view

In ReSharper 6 the above issue is prevented, not completely though. I'll show that in a minute.

The next thing is within a Razor view, in order to understand the location or path of an action, you have to understand how the application has been implemented unless of course the name of the Controller has been specified within the call. In the above markup example, it hadn't, it's inferred at run time. So take the following markup again:

@Html.ActionLink("Register", "Register2")

The above markup requires you to know how the view was generated, from which controller. that piece of HTML is actually from the LogOn.cshtml partial. Wouldn't it be neat if you could just click the Register2 action in order to navigate to it?

Installing ReSharper 6 allows you to do just that which I'll show in just a few moments...

Controller to view navigation

With ReSharper 5.1 there was a little support for finding Views from Controller actions. For example take the following example from the AccountController in the MVC 3 sample application:
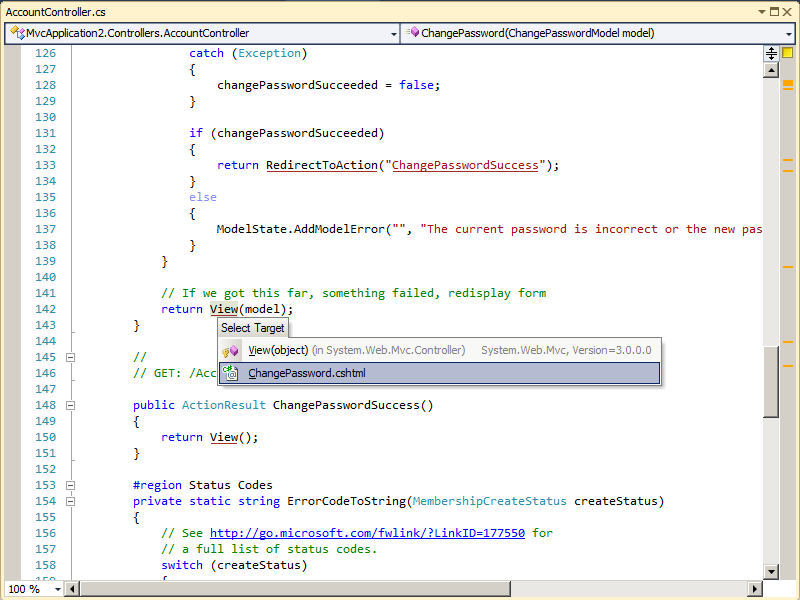
Figure 2: Searching for the view from a Controller using ReSharper 5.1

Here we can resolve the view and navigate to it, which is great, but I'd really like to know the path of the view in some cases.

Now after ReSharper 6.0 is installed (compatible with VS 2010) lets look at some of the above issues we had before.

One thing you will notice when upgrading to ReSharper 6.0 from either 5.0 or 5.1, is you need a new licence key. ReSharper 5.x licence keys do not work for ReSharper 6.0:

Figure 3: ReSharper 6.0 requires a new licence key (I did blank out my 5.1 key, sorry!)


Razor view to controller navigation (RS 6.0)

So now if we open up the LogOn.cshtml file as before and take a look at some of the Razor markup for Controller navigation, we get the following:

Figure 4: New support in Razor for Controller action resolution
So now I have the familiar ReSharper support for just navigating to a method from a calling piece of code. It just so happens here that ReSharper understands the routes setup within an MVC application.

Also notice in this version of ReSharper the familiar "type" box, whether you get this via CTRL + Click or CTRL + T, now shows you the actual project the type lives. This is another powerful feature if the namespaces do not match up to assemblies.

You can get the above menu displayed simply by pressing CTRL + then click the action.

Pressing those key combinations displays a list of methods that match the action name for the controller that generated the view. To navigate to a given action, simply click the desired one in the pop up list, ReSharper will then open that source code and place your cursor at that method.

Notice the above action name is underlined. ReSharper uses this notation to signify that the action or type has been resolved successfuly. This is new when it comes to string types as the action name passed to the Html class is actually a string.

So as before if we now mistype an action that doesn't exist anywhere, ReSharper kindly lets us know there is an issue:

Figure 4: ReSharper 6.0 tells us when the action cannot be resolved!

I really like the above feature. It can save you time. Also notice as the above error gets marked on the right side of the source window above, this is a standard ReSharper feature. Because it's been marked red, it means it's an error.

Although the code will compile and run as before, ReSharper is doing it's best to let you know there is a problem and should be fixed.

Controller to view navigation (RS 6.0)

As we looked earlier, there is a bit of support for Controller to view navigation in ReSharper 5.1, but it gets better in ReSharper 6.0.

So now in version 6.0, placing the mouse cursor over the call to the View method within the controllers (or which ever base controller method is being called) no longer displays the overloads as it did before, instead you get a tool tip that gives you the physical location of the view. In this case we are using Razor so it is the .cshtml file:

Figure 5: In ReSharper 6.0, you can see the physical location of the actual view file from the controllers

I really like the above feature, it just means you have to think less!

There are more features to ReSharper 6.0 but the above ones are the ones I thought were the best, enjoy!

You can download a free 30-day trial of ReSharper 6.0 for Visual Studio 2010 from here: http://www.jetbrains.com/resharper/
 

Thursday, September 22, 2011

Removing the dreaded #regions using Visual Studio

Back when .NET was released in 2001, the #region/#endregion feature seemed like a good idea at the time. I think it was more a novelty than anything.

If you are a seasoned .NET developer you will probably know what #regions are and how annoying they can be (or you might support them, shame). For those who don't know what they are, this MSDN page might help explain #regions a little: http://msdn.microsoft.com/en-us/library/9a1ybwek.aspx

There have been many posts about #regions over the years. There was one I was reading recently that claimed #regions are a sign of code smell! That is pushing it a bit, they are not code smells but are very annoying and if I used #regions it might say something about my code. It might say that I write large bloat god type classes that need regions to split it up in order to maintain it more easily - that you could argue could *potentially* lead to a code smell.

When I open some source code file, often it will not be my code or sometimes it might be. Lets assume its not. Lets also assume that the developer of that source code like regions. The first thing I get is the screen shot below:


Figure 1: God class with regions and outlining feature turned on


So now in order to understand this GodClass, I'm going to have to expand all those regions as I didn't write this code. All I want to do is get at the code to understand it, these #regions are preventing, or rather, making it more difficult for me from doing so.

The title to this post reads "Removing the dreaded #regions using Visual Studio". So if you're in a shop that loves to use #regions or your code base is such that to remove all the #regions would be weeks of work, fear not! I didn't know this feature existed in Visual Studio up until a couple of days ago but you can actually turn off the *outlining feature* that makes #regions possible.

To turn off this feature do the following:

  1. In Visual Studio click Tools -> Options
  2. In the options tree view, click Text Editor -> C# -> Advanced
  3. Then untick option Enter outlining mode when files open (see figure 2 below for an example)
  4. Click OK
  5. Enjoy!

Figure 2: Turning off #region support in Visual Studio

As far as I am aware there doesn't seem to be support for this if you're using VB.NET. This only seems to be a C# feature right now.

So now if I load the GodClass in Visual Studio, I get the following source code:


Figure 3: Outlining turned off

It's not perfect I admit as the regions are still there, but at least I can now see the code without having multiple mouse clicks in doing so...

Windows 8 pre-beta: DRIVER_IRQL_NOT_LESS_OR_EQUAL (storahci.sys)

After the announcement of Windows 8 pre-beta at the Microsoft BUILD conference recently I was dying to install the pre-beta release of Windows 8.

So I downloaded a developer edition from MSDN here: http://msdn.microsoft.com/en-us/windows/apps/br229516

Microsoft offer a couple different pre-built ISO images, 32-bit, 64-bit and 64-bit with a early release of DEV11 and a early cut of Expression Blend 5. Which one did you think I downloaded! ? :)

My client VM tool of choice of late is Oracle VirtualBox. I am currently running 3.2.10 on my production laptop and cannot upgrade for reasons that doing this will break existing VM's that I have.

So disappointingly, when I attempted to install the early cut of Windows 8, I got the error in figure 1 below:


Figure 1: Error when attempting to install pre-beta Windows 8 ISO

Also, it seems the VM also consumes aload of CPU resource when the above error occurs until you kill the VM. See figure 2 below:


Figure 2: CPU consumption after Windows 8 fails to start

After searching the internet for this error, I came across the Windows 8 team blog post that lists the Virtualization technologies that are supported by this drop of Windows 8 here.

I recommend you read the blog post link above before installation of Windows 8 pre-beta.

So the next thing I tried was to run the latest version of VirtualBox which is 4.1.2 on another machine as I couldn't upgrade my production laptop. After doing this and attempting the Windows 8 install again, I got another completely different cryptic error message which haulted the installation.

The next thing to try (which is what I should have done to begin with) was to use one of my physical Windows Server 2008 R2 Hyper V box to host the OS and thankfully, it worked!!

So shortly after I fired up the Windows 8 install wizard I was presented with the licence terms agreement for this early release:


Figure 3: Windows 8 pre-beta licence agreement with dev 11

So far it seems fairly stable, I haven't seen any crashes yet and really just trying it out. I'm not quite brave enough to put it onto my physical main laptop just yet...

Friday, June 03, 2011

CQRS – the future for low-latency systems…

I wrote a post on my other blog here: http://smart421.wordpress.com/2011/06/02/cqrs-the-future-for-low-latency-systems/ that is about pure CQRS.

I have been interested in CQRS for sometime now and I wrote this off the back of a recent CWDNUG session in London a few days ago: http://www.meetup.com/cwdnug/events/18182511/